Ever wondered into the possibilities if you could perform all your basic functionalities like sending email, updating status, selecting templates, creating tasks etc in a single click instead of multiple clicks in Salesforce. Single clicks not only do save time but also help in the consistency of any agents work. Time is money for support agents who handle multiple activities at a time. Not only support agents but for all those people who are lazy clicking multiple times when tasks can be performed in a single click. With Macros this is very much possible.
Macros are more or less like set of computer instructions which provide you functionalities like sending email, updating field, creating tasks, etc with a single click. Macros are a part of the standard salesforce objects and you can find it easily under the setup->customize section in salesforce. Macros work with the feed based layout and for using it for any object, it needs to be enabled for that specific object. Earlier macros were only supported on feed based layouts for account, contact, lead, and case objects. Howsoever, with the latest spring’16 release it has been made available for all standard and custom feed based objects. One of the downside of Macros, apart from the availability for only feed based layouts, would be that this feature is only available on salesforce classic. These two minor disadvantages are definitely overlooked by the functionality of performing tasks in single clicks.
So lets save some time and clicks for your agents and help setup Macros for your organization. Before setting up Macros, we need to take into consider a few things as below:
- Is feed tracking enabled for the object on which you need to setup Macros?
- Is feed based page layout created for the object on which you need to setup Macros?
- Are all the publisher actions that you desire to setup through Macros added to the object?
- Is Macro browser already added to the console application?
- Are permissions granted for the Macro creation?
Lets consider we need to setup Macros for the standard object “Opportunities”. So inorder to set this up we will first set up the above points.
Enabling Feed Tracking
In order to enable feed tracking, go to setup-> customize -> Chatter -> Feed tracking or you can directly go to setup and search for feed tracking in the quick find/search box on the left. Now select the “Opportunities” object and check the “Enable feed tracking” check box on the top. Also select the fields that you need to be tracked on the feed layout.
NOTE: You can select upto a maximum of 20 fields for feed tracking.
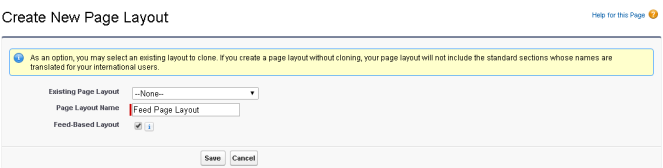
Creating Feed based page layout
If a feed based page layout has not already been created for opportunities object. Feed based layout creates separate tabs for feed view and detail view for the page. Go to setup-> Customization -> opportunities -> Page layouts -> Create New. Once clicked on create new you will see the below screen, provide a name for the page layout and check the “Feed-based layout” checkbox, and click next and save.
NOTE: You need to set the feed page layout in the page layout assignments as per requirement.
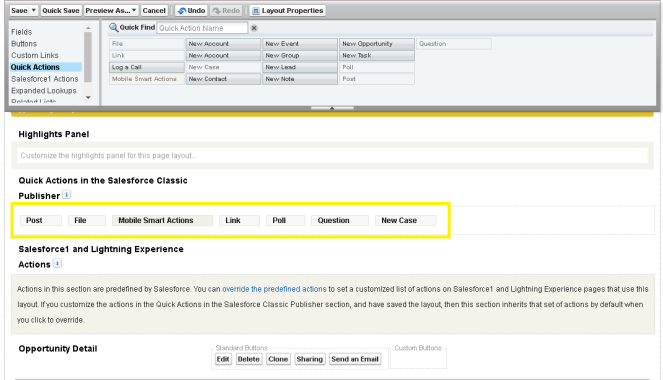
Publisher actions setup
For example we need to use email action in macros then we need to add email action to the Opportunities page layout. Go to the page layout that has been created and add the quick actions by dragging and dropping to the quick actions section like the below screenshot.
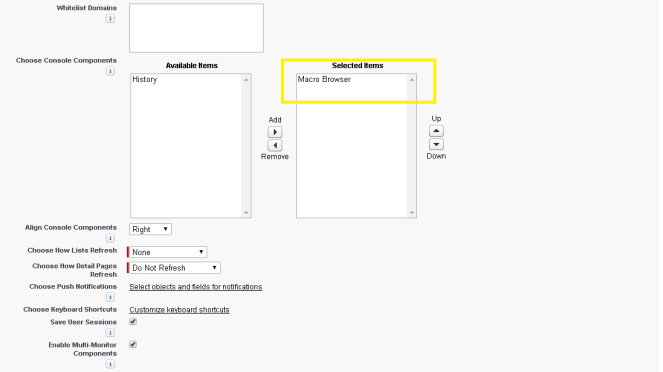
Adding Macro browser to Console App
This will be the last step that needs to be performed for the setting up of Macros. Go to Setup -> Create -> Apps -> New Console app. This will create a new console app and you need to add the “Macro browser” widget to the newly create console app in order to make it visible on the Console app.
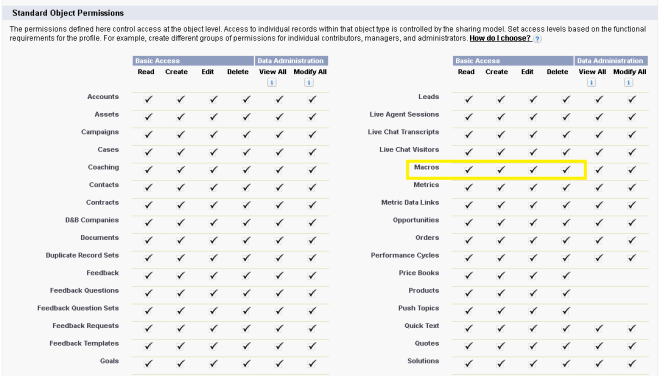
Permissions required for Macros
For any user able to create and edit Macros, the user profile should have the following permissions:
- To view Macros- “Read” permission on Macros object.
- To create and edit Macros- “Create” and “Edit” on Macros object.
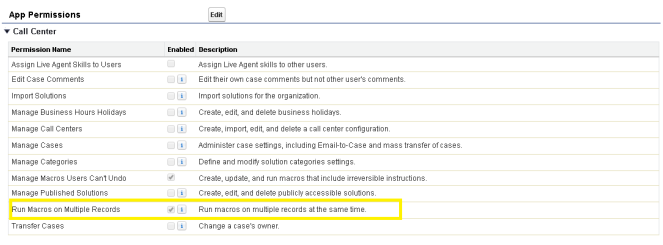
Go to Setup-> profiles -> Select the profile for the user who should be able to create and edit Macros. Once profile is selected go to “Object settings” and search for Macros and grant the read, create, edit and delete permission as per requirement. In order to run “Bulk Macros”, you should also enable the “Run Macros on multiple Records” option under the system permissions for the profile.
Once the above tasks are completed we are all set to use Macros for the Opportunities object. Now in order to setup Macros, go to the Console app on which the “Macro Browser” widget has been made available, you should see something as follows at the bottom right corner.

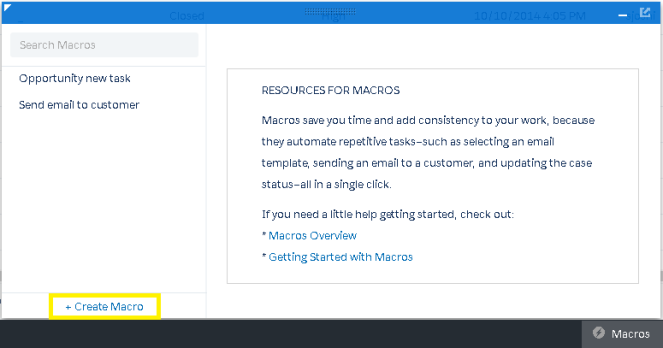
Click on Macros, and you should see a widget open as follows, click on “+create macro”.
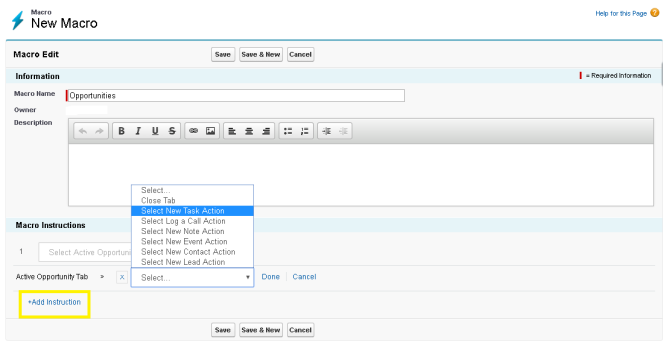
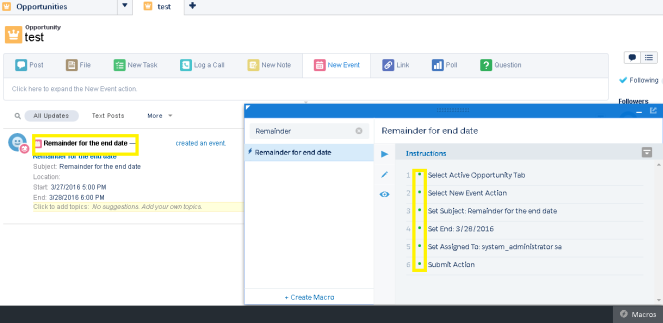
Once you click on “+Create Macro” you should see the following screen with the options to add the actions. Under the “Macro Instructions” section you will have the option to “+Add Instruction”. Once you click on “+ Add Instruction”, you should see something as follows, a list with all the possible actions possible. Once a instruction is added you can just click on “Done” and add multiple instructions. Add the instructions as per the requirement.
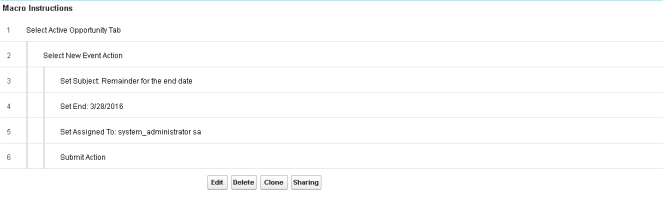
In the below snapshot i have created a “new task creation” macro instruction, so for any opportunity that is open and if i click on the macro and run it, it will create the new task for the opportunity as per the following macro instructions.
Once you are done, save the macro. Now go to the console app where the macro widget has been added and open an active opportunity tab. Once you open the tab, click on macro and search for the macro that you recently created and click on the “Play” button or just hit enter.
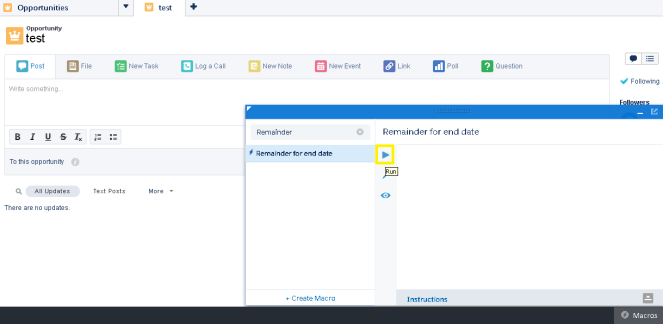
You should see a new task for the opportunity get created once the macro is run and you wont have to perform multiple clicks in order to create the new task. If all the Macro instructions run successfully you should see an instruction written in green saying macro executed successfully, if not executed successfully you should see a red dot at the specific instruction which the macro was not able to execute.
NOTE: A macro with a blue bolt indicates that this macro actions cannot be undone and a macro with green bolt and double lines under it indicates that it is a bulk macro which can be performed only in the increments of 10.
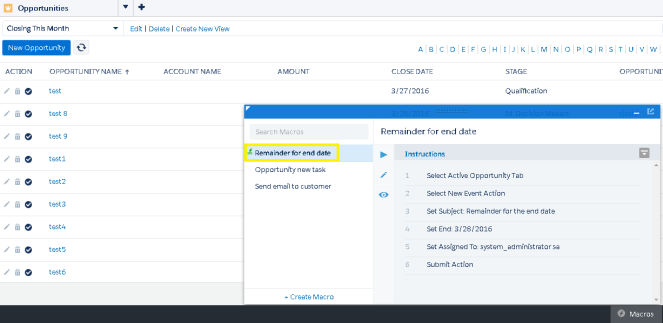
Bulk Macro
Like we performed Macros on single record we can perform bulk Macros for which we need to grant the permission to “Run Macros on multiple records” which is symbolized with a green bolt along with two lines. To grant the “Run Macros on multiple records” permission, go to setup-> select profile -> App Permissions -> Check the “Run Macros on multiple records” check box and save it.
Once this permission has been granted you can select 10 records together and perform such activity. In order to perform bulk macro, select a minimum of 10 Opportunities as bulk macros can be performed in the increment of 10 only. Once selected open the macros widget and you should see the Green bolt with double lines under it. And just click on run and it is done. With single click you will be able to apply the same macro to over 10 opportunities. This would save a lot of time as compared to the conventional way of sending emails individually.
So above were the steps required to create Macros/Bulk Macros for any object. Macros are really a great way to save time and save clicks. Hope with this post we helped you learn something new and definitely saved your time and clicks.
